


OwlPay Agent Wallet Tutorial: Step-by-Step Setup Guide
In AI Agent Wallets Explained: The Complete 2026 Guide, we uncovered how AI agents utilize non-custodial infrastructure to execute real-world financial use cases. To help you implement these capabilities, this practical guide outlines the workflows required to set up and deploy the OwlPay Agent Wallet.
Designed for maximum flexibility, commands can be executed either through your AI agent or directly in a standard terminal. Read on to navigate installation, secure identity onboarding, and cross-chain fund management.
Prerequisites: Node.js 20+ (Compatible with macOS, Linux, and WSL).
Who Is This Agent Wallet Tutorial For?
This step-by-step walkthrough is designed for solopreneurs, independent professionals, and developers looking to give their AI tools autonomous financial capabilities.
Whether you already own a crypto wallet or are a complete beginner looking to start from scratch using fiat currency, this OwlPay Agent Wallet guide makes connecting an AI agent to a crypto wallet seamless. It shows you exactly how to deploy a secure, compliant, and self-custodial agent wallet that empowers your AI to handle stablecoin on/off-ramps and execute agentic payments, such as:
- Paying for Digital Resources: Automating micro-payments for API access, specialized data queries, or cloud computing power.
- Booking Travel & Logistics: Letting your AI agent autonomously plan, book, and pay for flights or hotel services on your behalf.
- Automated Vendor Reorders: Triggering instant stablecoin payouts to suppliers the moment inventory or software subscriptions need renewal.
Let’s dive into the configuration steps to set up this specialized crypto wallet for AI agents.
Before you start: back up your seed phrase
OwlPay Agent Wallet is non-custodial. That means your seed phrase is the only key to your funds. Your AI agent can operate the wallet, but it does not store or remember your seed phrase. That responsibility stays with you.
One way to manage this is to pair it with OwlPay Wallet Pro on your phone. Log into the same account, and both will sync to the same wallet. It doesn't matter which you set up first. If you start with Agent Wallet, import your seed phrase into Wallet Pro afterward. If you already have Wallet Pro, import that seed phrase during Agent Wallet onboarding. Either way, you won't need to start from scratch.
Step 1: Install
The whole setup typically takes around 1 to 3 minutes. Here's a quick video walkthrough:
Option A: Let your agent handle it
Paste this into your agent (Claude Code, Codex, OpenClaw, or any agent that supports CLI tools):
Install https://www.owlting.com/owlp-cli for me
Your agent reads the page, installs the CLI, and sets up the skill file automatically.
Option B: Run it yourself
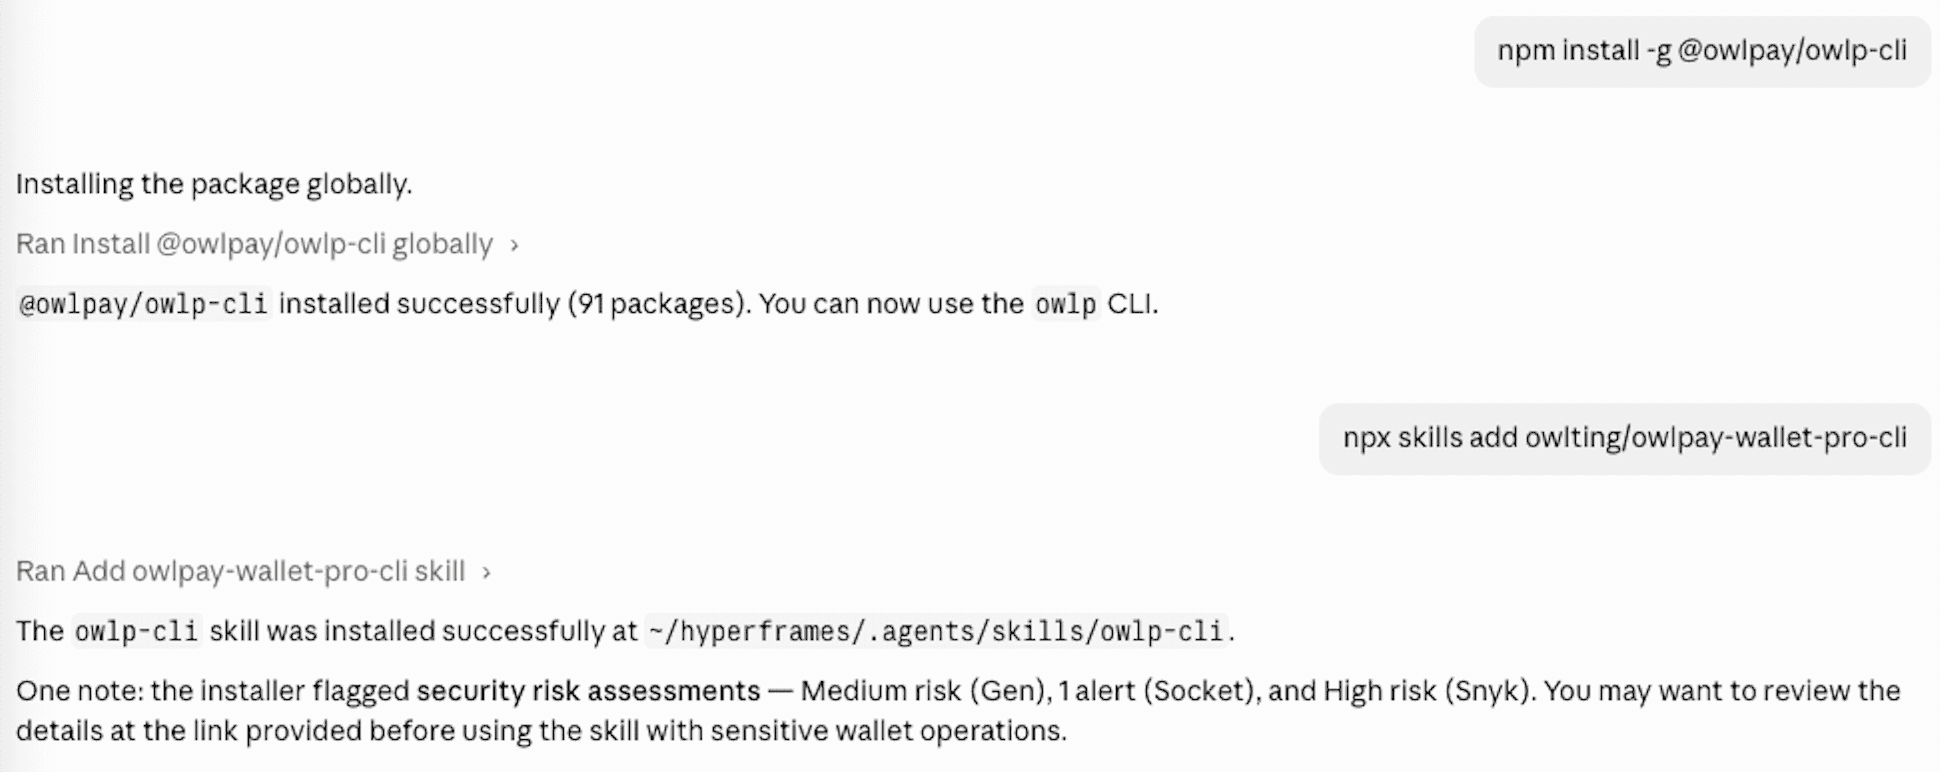
npm install -g @owlpay/owlp-cli
npx skills add owlting/owlpay-wallet-pro-cli
The second command installs the skill file, which lets your agent understand every command and option without extra configuration. Once installed, Claude Code, Codex, OpenClaw, and compatible agents can use the wallet directly.
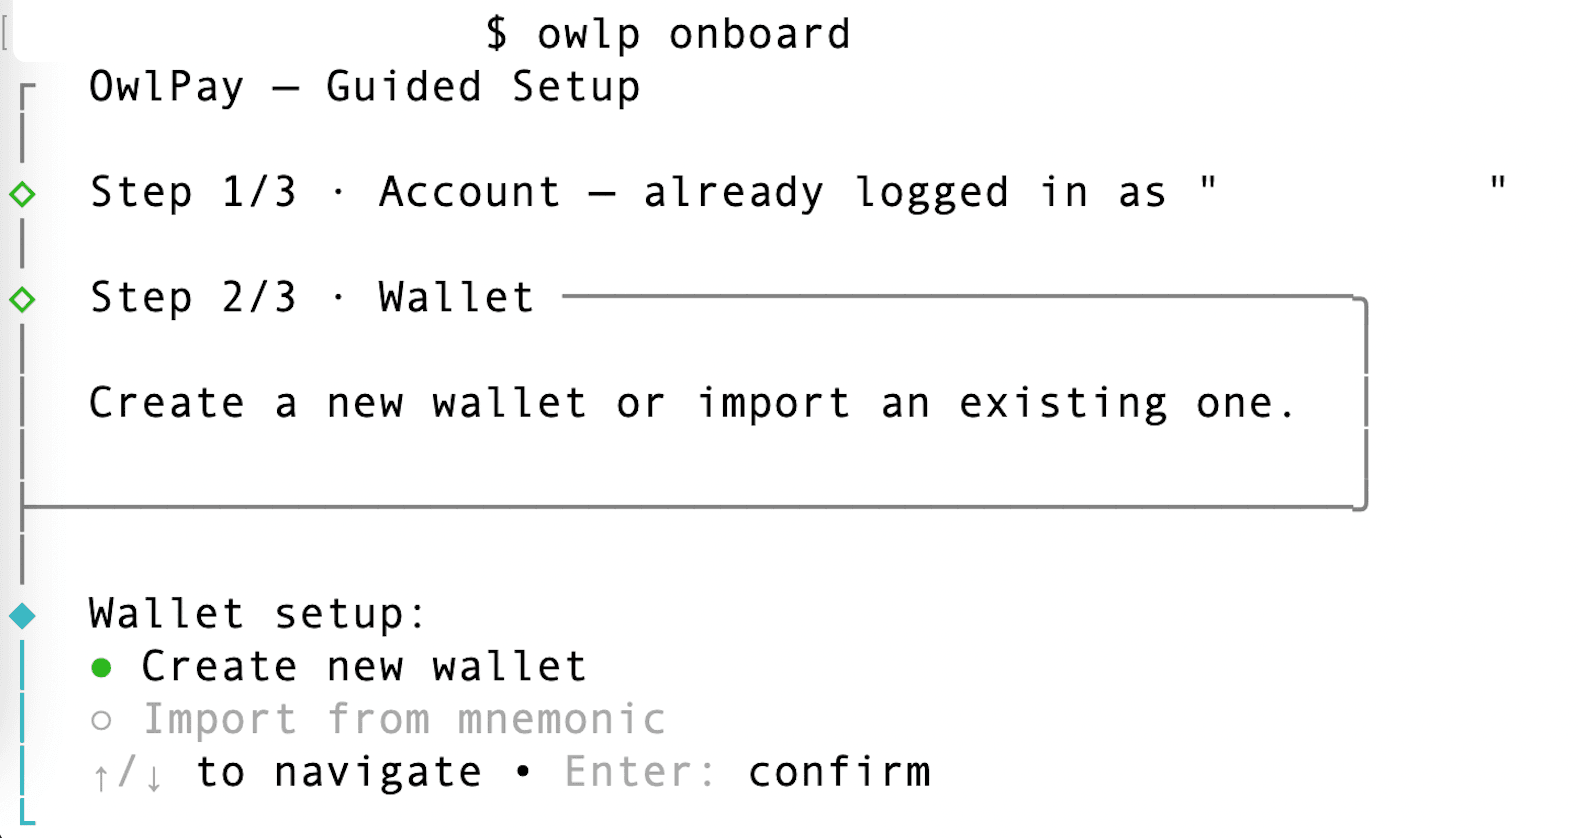
Step 2: Onboard and set up your wallet
owlp onboard
This runs through everything in one go:
- Account login: your agent will ask for permission to proceed — select "Allow" or "Always allow" when prompted. It then opens a login link. Sign in via email or Google, and the browser shows an authentication code. Copy it and paste it back into your agent. Your account is now verified.
- Wallet setup: you'll be asked to create a new wallet or import an existing one.
- KYC (identity verification): required only if you plan to use on-ramp or off-ramp (buying or selling crypto). For send and receive only, you can skip this and do it later.

Step 3: Create or import a wallet
⚠️ Run this step in your terminal, not through your AI agent.
When you create a wallet, your seed phrase appears on screen. For security, this should never pass through an AI conversation — keep it in your local terminal only.
- Open your terminal and run:
owlp onboard
Use the arrow keys to select Create new wallet and press Enter.
Your wallet addresses are generated across all three networks:
Wallet created
Created as "wallet-1"
EVM:     0x...
Stellar: GDU...
Solana:  5dt...
Immediately after, your seed phrase appears on screen:
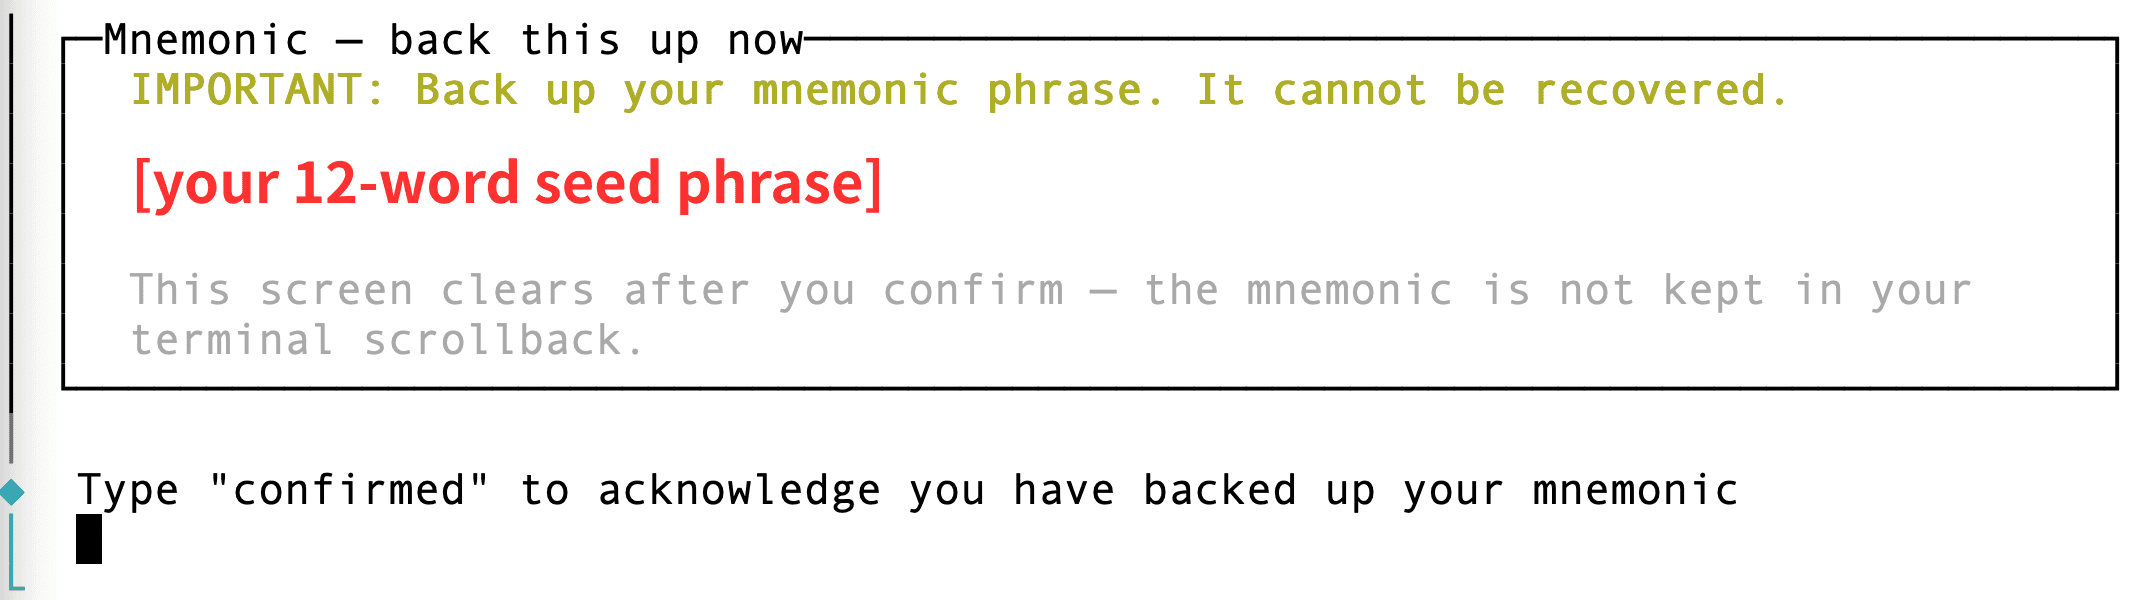
Write it down now. Once you confirm, it's gone from the screen permanently.
Type confirmed and press Enter to proceed.
- Importing an existing wallet instead?
- Select Import from mnemonic and enter your existing seed phrase when prompted. Your balance and on-chain history will carry over.
Step 4: Add funds
Before your agent can send anything, you need a balance on the chain you want to use.
To buy USDC with a debit card:
owlp deposit
If this is your first time, the CLI gives you a link to bind your debit card. Open the link, enter your card details, and come back when you're done. Once your card shows as active, tell your agent — it confirms the status and you're ready to go.
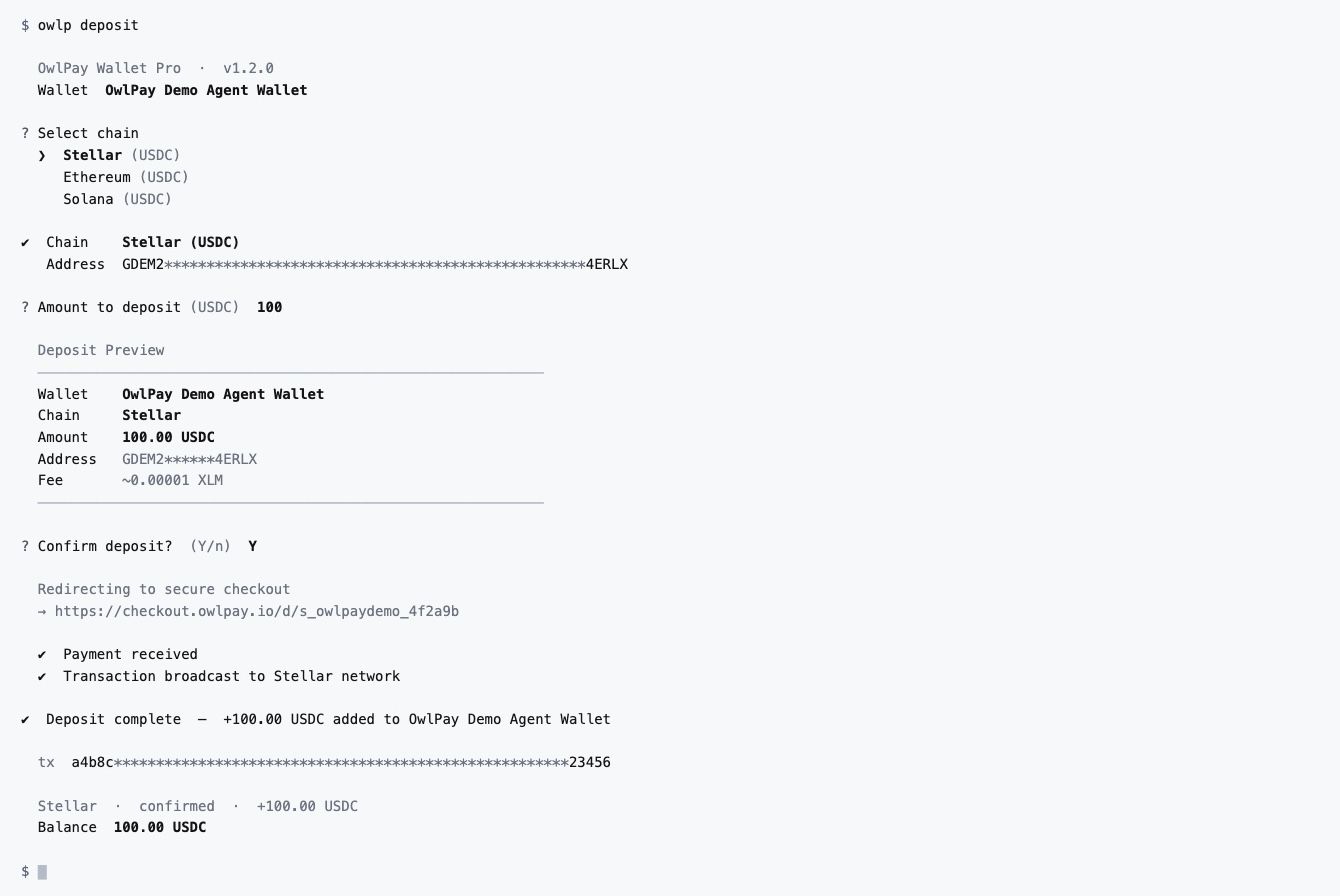
After that, your agent gets a quote, you confirm, and it handles settlement.
To check your balance:
owlp balance --json
Add --chain stellar (or evm / solana) to filter by network.
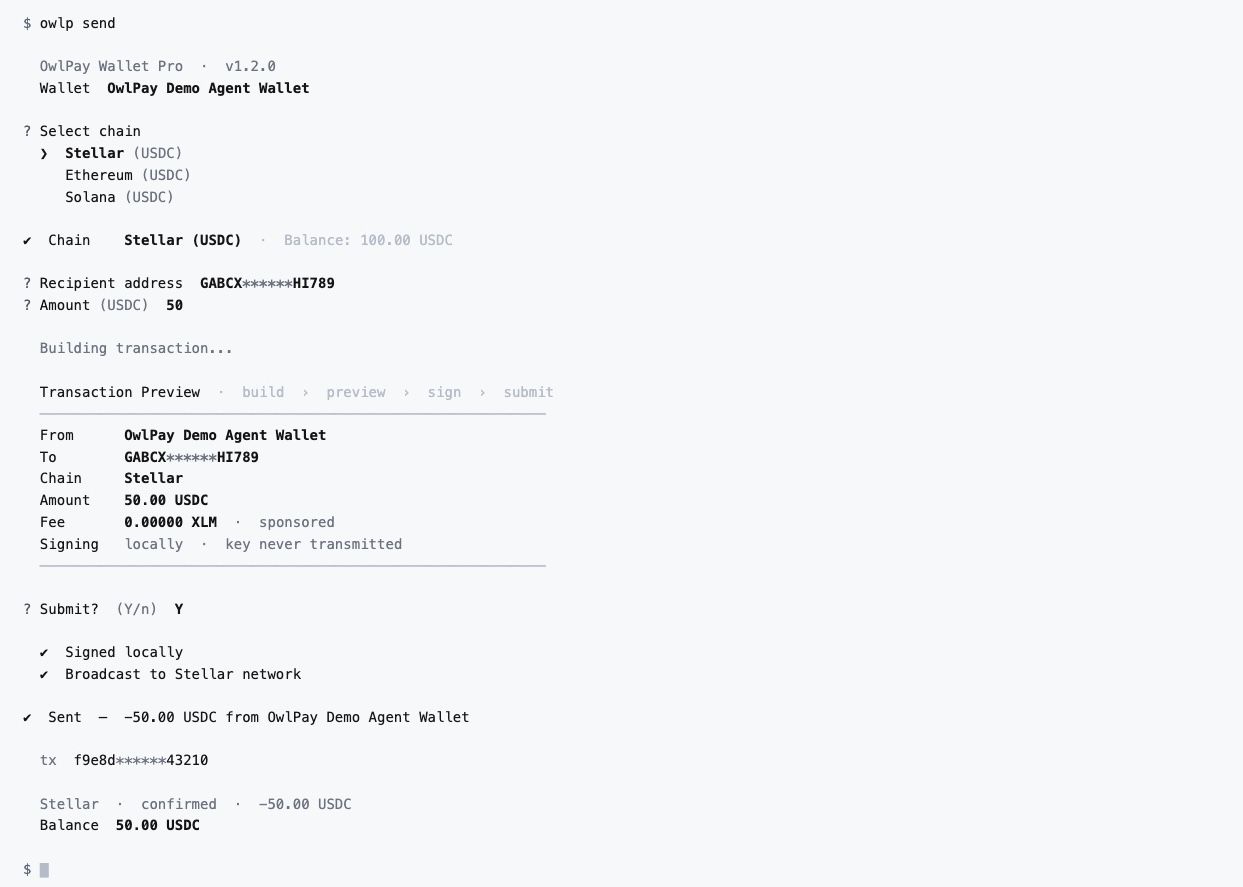
Step 5: Send your first transaction
Tell your agent what you want to send and to whom. It builds the transaction and shows you a full preview:
Chain stellar
From GCKFBEIY..SMTGG
To GA5XIGA5..GGKTM
Amount 10 USDC
Fee Sponsored
Review the details. Confirm — your agent submits and returns the tx hash when done.
Or run it directly:
owlp send
The command walks you through each field step by step: destination address, chain, wallet, token, and amount.
Nothing is submitted until you confirm. Every transaction goes through a preview first.
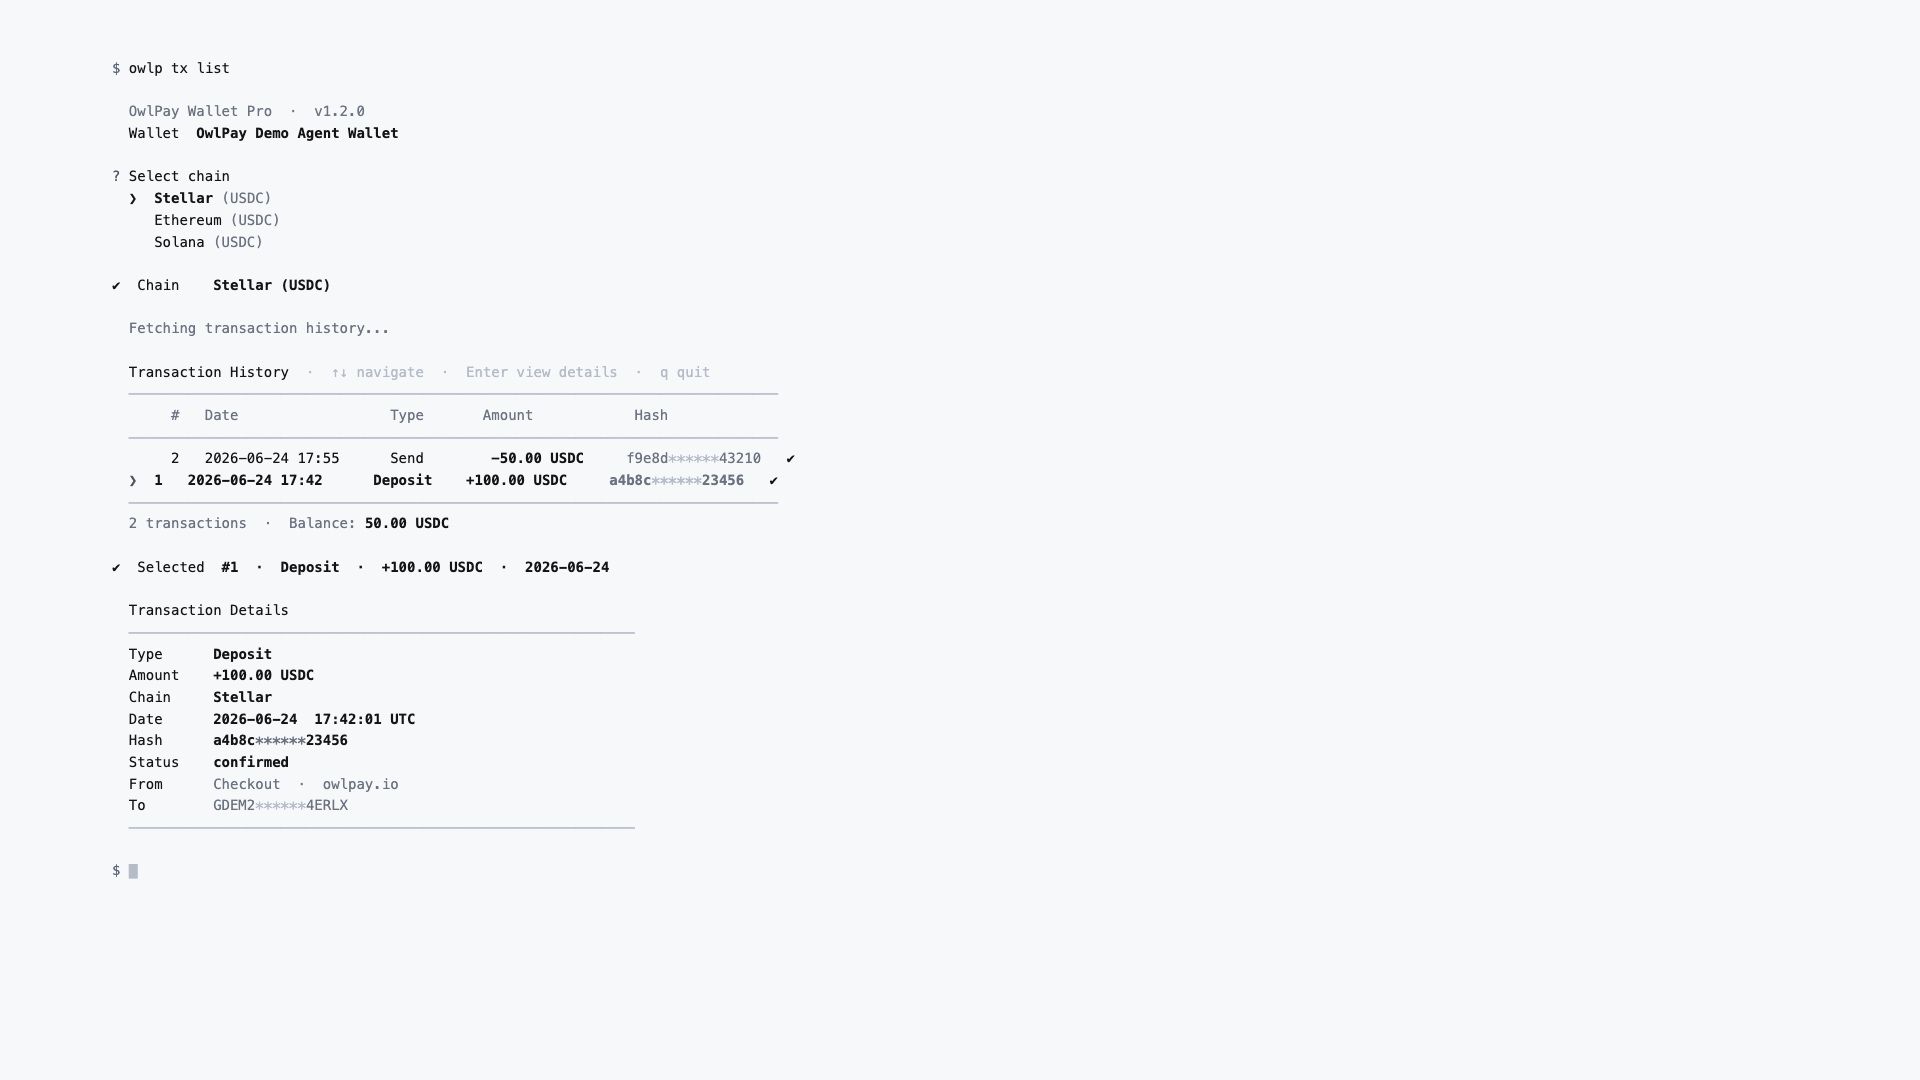
Step 6: Check transaction history
owlp tx list
Interactive picker — scroll through past transactions, filter by chain or date. Useful for end-of-month reconciliation or just checking what went through.
Verify an address before sending
Before sending to an unfamiliar address, validate it against the correct chain:
owlp verify --chain solana --address [address]
Confirms the address format is valid for that network before you commit.
Common issues
- Agent doesn't recognize owlp commands
- Make sure you ran npx skills add owlting/owlpay-wallet-pro-cli after installing. Without the skill file, the agent has to piece things together on its own.
- Browser won't open for login
- Check that your system allows the terminal to launch a browser. On some Linux environments you may need to set a default browser first.
- Balance shows zero after deposit
- Settlement takes a moment. Run owlp balance --json again after a minute. If it still shows zero, check you're looking at the correct chain.
- Seed phrase not backed up
- If you haven't written it down yet, do it now. Your agent doesn't store it. If your machine is wiped and you haven't backed it up elsewhere, the funds are not recoverable.
FAQ
Do I need to log in again every time I open my agent?
No. Once OwlPay Agent Wallet is set up on your machine, it stays ready. You don't need to re-authenticate or re-enter your seed phrase each session — your agent picks up where it left off.
Can I check my balance or send funds from my phone?
The owlp CLI runs locally on your computer, so your phone's Claude app can't directly control it. But you don't need it to.
OwlPay Agent Wallet and OwlPay Wallet Pro share the same account. Install OwlPay Wallet Pro on your phone, log in with the same account, and your phone becomes a live window into the same wallet your agent is operating — same addresses, same balance, updated in real time.
The setup works well in practice:
- At your desk: your agent handles the automated side — sending payments, checking balances, queuing transactions.
- On the go: OwlPay Wallet Pro gives you visibility and manual control from your phone whenever you need it.
What if I switch to a new computer?
OwlPay Agent Wallet is built for automated, agent-driven workflows — which means the wallet runs locally on your machine, close to where your agent operates. On a new computer, you'll need to restore it.
Run owlp onboard in your terminal, select Import from mnemonic, and enter your seed phrase. Your wallet comes back exactly as it was.
This is also why the seed phrase matters so much. Your OwlPay account identifies you, but the wallet itself lives on your hardware. The seed phrase is the one thing that travels with you regardless of device.
If you're ever in a situation where your machine is lost or compromised, the right move is to restore your wallet on a new device using your seed phrase and move your funds from there. That's true of any non-custodial wallet — Agent Wallet included.
OwlPay Wallet Pro on your phone serves as a useful second access point here too: if you can get to your phone, you can get to your wallet.